Finishing touches
Adding a menu label
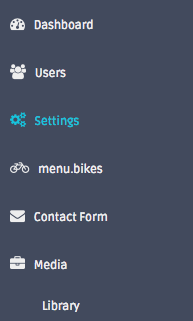
You’ll notice that the menu label for the bikes administration doesn’t look quite right.
This is because Perform uses Symfony’s translation features to render the labels for menus, making it possible to translate your application into multiple languages.
Add the following to src/AppBundle/Resources/translations/PerformBaseBundle.en.yml:
menu:
    bikes: 'Bikes'
and clear the cache:
./bin/console cache:clear
Your chosen label for the bikes menu link should now be shown.
Data fixtures
Development can be aided significantly by creating data fixtures to pre-populate a database for development.
Let’s create a simple fixture class for bikes.
Generate an empty fixture class:
./bin/console perform-dev:create:fixture AppBundle:Bike
Now open the generated file
src/AppBundle/DataFixtures/ORM/LoadBikeData.php and set some data
for the generated entities:
  public function load(ObjectManager $manager)
  {
      $faker = \Faker\Factory::create();

+     $images = $manager->getRepository('PerformMediaBundle:File')
+             ->findByType('image');
+
+     if (count($images) < 1) {
+         throw new \Exception("Can't load bike fixtures with an empty media library.");
+     }
+
-     for ($i = 0; $i < 20; $i++) {
+     for ($i = 1; $i < 21; $i++) {
          $bike = new Bike();
+         $bike->setTitle('Bike number '.$i);
+         $bike->setDescription($faker->paragraph);
+         $bike->setImage($images[array_rand($images)]);

          $manager->persist($bike);
      }

      $manager->flush();
  }
Here we grab some images from the media library and use them to create some dummy bike entries in the database.
Use the perform:fixtures command to run the fixtures, but only for
the Bike entity:
./bin/console perform:fixtures --only-bundles AppBundle
You should have a fresh set of bikes entries, linked with images you’ve added to the library.
Note
Why use the perform:fixtures command instead of the command
included in the DoctrineFixturesBundle?
perform:fixtures searches for fixtures that implement
EntityDeclaringFixtureInterface, which extends Doctrine’s interface with
getEntityClasses() to declare the entities each fixture manages.
This allows us to use the --only-bundles option to run a subset
of fixtures that just purges the relevant tables, instead of the
entire database.
This can be extremely useful when logged in during development;
just run the fixtures for the entities you need and prevent your
current user account from being deleted.
Finish
Congratulations, we’ve created a simple site and administration area in a tiny amount of time using Perform.
We’ve learned how to:
- Create a new application.
- Create entities and manage them with Perform’s CRUD tooling.
- Use the ContactBundle to create a contact form that notifies us when it is filled out.
- Extend existing entities to suit our requirements.
- Scaffold and customize a frontend with sass compilation and build tooling.
- Add database fixtures for entities.
Next steps
This tutorial only scratches the surface of Perform’s functionality.
Having learned the basics, you should now dive into the topics that interest you most.
For a more in-depth understanding of the topics we’ve covered in this tutorial, have a read through the base bundle documentation.
Alernatively, have a browse through the documentation for the other bundles. There are bundles for many functions; everything from media libraries and galleries to page editors and social media integration.
../more/index covers advanced Perform use cases that integrate multiple bundles at a time, as well as articles that look at system internals.
Don’t hesitate to ask for help if you get stuck. Support is included with pro licenses and above to make the Perform learning curve as smooth as possible.
Most of all, have fun!