Adding frontend pages
Now we’ve got a basic admin area working, let’s create some frontend pages to display the bikes.
Create base files
Perform doesn’t impose any structure on the frontend of your application, however the DevBundle does provide optional tools to build a frontend quickly.
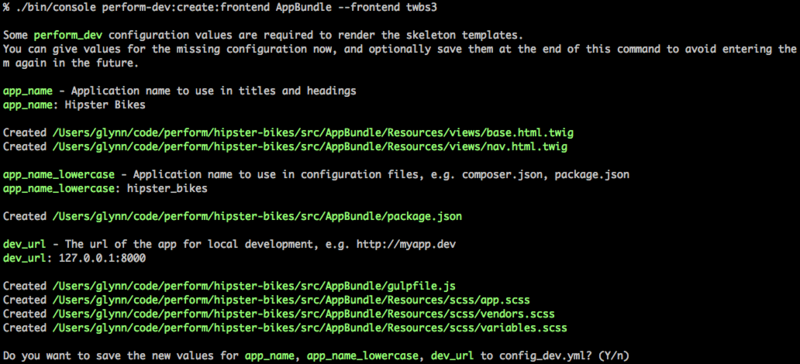
Let’s use the perform-dev:create:frontend command to create some basic files in the AppBundle:
./bin/console perform-dev:create:frontend AppBundle --frontend twbs3
This command will ask for information when generating some of the files, such as app_name - the name of our app to use for headings and titles.
You can give any answers, but make sure to give a correct
value for dev_url if you want browsersync live asset reloading to
work correctly.
We’ll use 127.0.0.1:8000 since we’re using the built-in server for this tutorial.

Using twbs3 for the frontend option has incorporated Twitter
Bootstrap 3 in the generated files, including a package.json with
the relevant packages and gulpfile.js with tasks to build the
assets.
Now run the perform:install command, which will download and build the new assets in the AppBundle:
./bin/console perform:install
Note
A frontend is a concept restricted to the DevBundle, and is only used when generating new code.
It is not designed to impose any restrictions on the layout of your application, but simply as a way to generate common frontend files in different ways.
Other frontends are available; use the perform-dev:debug:frontends command to see them.
You can create your own frontends too. See the documentation for the DevBundle.
Add a route
Let’s use more commands from the dev bundle to create a controller and twig template for the homepage of Hipster Bikes.
Create a controller class
./bin/console perform-dev:create:controller AppBundle:Page
and a page
./bin/console perform-dev:create:page AppBundle:Page:home --frontend twbs3
to generate src/AppBundle/Controller/PageController.php and src/AppBundle/Resources/views/Page/home.html.twig.
Open PageController.php to see the generated class:
<?php

namespace AppBundle\Controller;

use Symfony\Bundle\FrameworkBundle\Controller\Controller;
use Sensio\Bundle\FrameworkExtraBundle\Configuration\Route;
use Sensio\Bundle\FrameworkExtraBundle\Configuration\Template;

/**
* PageController
*
* @Route("/page")
**/
class PageController extends Controller
{
    /**
    * @Route("/")
    * @Template
    */
    public function indexAction()
    {
        return [];
    }
}
Let’s make some small modifications.
Rename indexAction to homeAction to match the name of the page we just created,
and remove the top level route annotation, so the action matches the url / in the browser.
- * @Route("/page")
  **/
  class PageController extends Controller
  {
      /**
      * @Route("/")
      * @Template
      */
-     public function indexAction()
+     public function homeAction()
      {
          return [];
      }
  }
Note
Matching the action name with the twig template is merely a convention.
It enables use of the @Template annotation without arguments, which also allows the action to return an array, instead of returning a Response object directly.
Like everything else in Symfony, this is completely customisable. See the symfony docs for more information.
Now update app/config/routing.yml to load routes from the new controller:
+ app:
+     resource: "@AppBundle/Controller/"
+     type: annotation
This will add all annotated controller actions in the AppBundle.
Now head to the new home page action at http://127.0.0.1:8000.
Congratulations, we’ve got a blank home page!
Loading bikes
Let’s load some bikes from the database into the frontend.
Add the following code to the home action in the controller:
   public function homeAction()
   {
+      $bikes = $this->getDoctrine()
+             ->getRepository('AppBundle:Bike')
+             ->findBy([], [], 10);
+
+      return [
+          'bikes' => $bikes,
+      ];
-      return [];
   }
Note
There is nothing Perform-specific about this; we’re just loading Doctrine entities in a controller.
And update the content block in src/AppBundle/Resources/views/Page/home.html.twig:
  {% block content %}
+   <div class="container">
+     <div class="row">
+       <div class="col-md-12">
+         {% for bike in bikes %}
+         <h2>{{bike.title}}</h2>
+         <p>
+           {{bike.description | nl2br}}
+         </p>
+         {% endfor %}
+       </div>
+     </div>
+   </div>
  {% endblock %}
Now add some bikes in the administration area and refresh the home page. You’ll see a list of 10 bikes with their titles and descriptions.